LinkyParties FeaturedOn AdvertiseOn AboutUs ContactUs
Don't forget to link up to our weekly {{What I Made Wednesday Party}}!

Wednesday, August 31, 2011

{{What I Made Wednesday}} #23

There were some GREAT projects & recipes last week!  Thank you so much to all of you who take the time to link up your latest & greatest to our {What I Made Wednesday} Party!
image
Now onto the favorites…
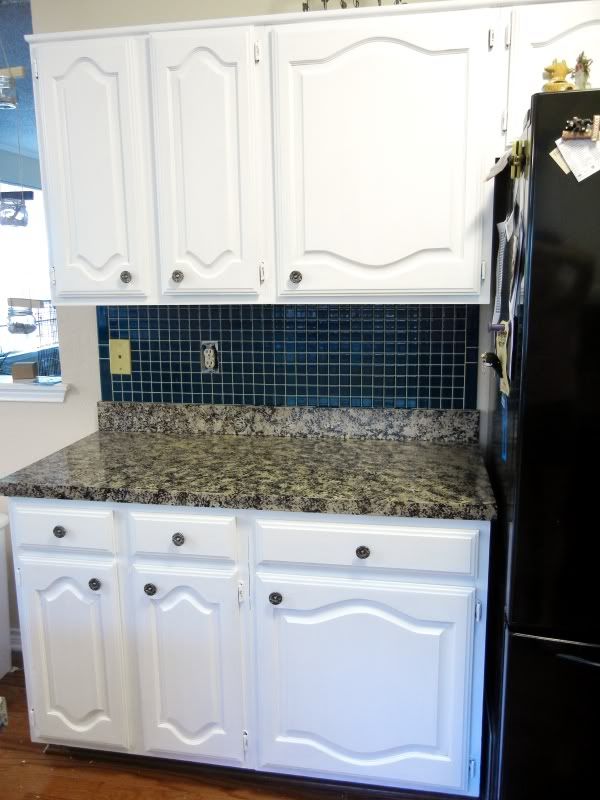
Do you dream of granite countertops like me? =) Well, I better keep dreaming, because it is NOT in our budget at this moment in time…sigh! So, when I saw this faux granite tutorial on Release Me Create, I fell in love! What a great idea to get the granite look without the price!
Also, she had the most views & is our Wednesday Winner….yeah for FREE advertising!
Mygirl 3
This old barn wood sign from Erin at Lemon Tree Creations is adorable!!!  I absolutely love the saying and would make a perfect addition to any room.
I’m in L-O-V-E with this idea from mad.amyt!  Her amazing tutorial walks you through how to make your own air fresheners!  I will definitely be trying this soon!
I’m loving this lamp redo from She’s Crafty!  Her upcycle turned out amazing and it makes me want to get busy redoing the lamps I just got from my hubby’s grandma.  Yeah for upcycles! :)
image
Now onto this week’s party…
Here are the details:
  • **NEW**  You must be a follower of our blog.
  • Everything you link up must be made by you.
  • Link up to your specific post - not your main blog. (Please no Etsy shops or giveaways)
  • Please post our button or link back to our blog so more people can join in the fun.
  • Visit at least 2 of the other participants and leave them a comment to show your LOVE!  We all love getting comments!!
  • **NEW** At the end of the week, the project that has received the most views will get their blog button on our sidebar for the next week!  You will be our {{Wednesday Winner}}!!  Yeah for free advertising! (:
Also, if you’ve been featured, don’t forget to grab our button!

Tuesday, August 30, 2011

Painted Vase Upcycle

 
IMG_2306_thumb3
 
On a whim, I recently purchased some new curtains that do not go with the rest of my color scheme.   I usually decorate in reds and earth tones so I’ve been slowly crating items that blend my aqua curtains with the rest of my living room.  Here are the curtains I bought:
IMG_2277_thumb1
With my hubby, you have to make changes slowly or he freaks out!  So, no full out redecorating for me….I replace things over time as to not alert the hubby!  {Good thing he doesn’t read my blog, or he’d know my little secret! =) }
 
You’ll need:
**  Old vase
**  Spray Primer
**Spray Paint
** Spray sealant
 
IMG_2270_thumb2
Awhile back my amazing parents sent me flowers.  I’ve been saving the vase ever since because I knew it would make an amazing upcycle.
 
IMG_2275_thumb2
To start out, make sure your vase is clean and dry.  Using a spray primer cover your entire vase.   {I’m partial to Zinsser 1-2-3 Bulls Eye Primer because it sticks to EVERYTHING!}.  Let it dry for several hours.
 
IMG_2301_thumb4
Once your primer is dry, coat the entire vase with the color of your choice.  Since I’m trying to add some “curtain matching colors” into my house, I chose aqua.
 
IMG_2302_thumb2
Our local hardware store did not have the aqua colored spray paint in a gloss finish, so I finished off my project with a clear gloss.
 
Texture_thumb1
And, to my surprise, the clear gloss added a sort of crackling texture to the vase.  Love it!  I’m not sure why it happened, because it only happened in some places, but I’m digging it! =)
 
IMG_2307_thumb2
Finally, I added some white vinyl to the front of my vase using the following fonts:  Arial and Freestyle Script.  I love how it turned out and especially love that unexpected crackle!
 
IMG_2303_thumb6
Now, I just have to find the perfect place to put it!
 
  Briana_signature_thumb1

Monday, August 29, 2011

Menu Monday

Monday~ Pizza, Vegetables & Dip

Tuesday~ Grilled Chicken, Mashed Cauliflower

Wednesday~ French Dip Sandwiches, Corn On The Cob

Thursday~ Shrimp Tacos

Friday~ Calzones

Saturday~ Grilled Hot Dogs, French Fries

Sunday~ Roast, Mashed Potatoes & Gravy, Corn On The Cob, Sliced Tomatoes

Alisa_Signature

Saturday, August 27, 2011

Creamy Chicken Noodle Soup {{Servin’ It Up Saturday}

I never used to make homemade chicken noodle soup until a friend told me how to make this version of the traditional chicken noodle soup….Creamy Chicken Noodle Soup! 

I tried it once and was instantly hooked!  I now make it all the time.  I don’t know what I love more….the creaminess, the noodles, the yummy carrots?  Ok, ok, it is all DELICIOUS!!!  Enjoy!!

kids 015

Creamy Chicken Noodle Soup

  • 3 chicken breasts, boiled & cubed
  • 6 cups water
  • 6 tsp. chicken bouillon granules
  • 1 medium onion, finely chopped
  • 1/4 tsp. black pepper
  • 1 bay leaf
  • 1/2 package wide egg noodles, cooked al dente.

new 028

These are possibly the best noodles I have ever used.  If you can, try and use these or something similar.

  • 2 cups chopped carrots
  • 1 cup chopped celery
  • 2 cans cream of chicken soup
In a large pot, add water, chicken bouillon, onion, black pepper, bay leaf, carrots & celery.  Bring to a boil.  Turn to low and simmer until vegetables are tender.  Add cream of chicken soup and stir until blended in.  Add chicken and noodles.  Heat until hot.  Serve & enjoy!
Alisa_Signature

Friday, August 26, 2011

Tangled Pumpkin

With fall just around the corner, I’ve been searching Pinterest for some fun fine motor activities for my kiddos to work on.  I recently stumbled upon this tangled pumpkin craft and knew it would be perfect for my little ones!  What’s even better?  The directions are so simple and we already have everything we need to make it!  Yeah! =)

Ready to challenge your own little ones and get them working on their fine motor skills?  Click here for the directions to this adorable craft!

Briana_signature

Thursday, August 25, 2011

Cereal Box Bow

When my daughter was born, I LOVED dressing her up and putting beautiful bows in her hair.  However, I couldn’t afford to buy all of the darling bows that you could buy in little shops, online or at craft fairs.  $7 for a bow…..REALLY?!?!?  That is when I started making my own bows!  I even sold them at craft fairs for awhile.  Have you ever looked for bow tutorials online?  There really aren’t that many free tutorials, but a ton that you can pay for.  Who wants to pay for bow instructions?  This is a tutorial of one of my most popular bows!  I hope that you too can save some money by making your own bows. 

Now for my tutorial…

Cereal Box Bow

bows-041_thumb6

Have you ever wanted to make bows, but don’t quite know where to start?  This is the tutorial for you!  It is SO easy….anyone can do it!

You’ll need:

bows-004_thumb2

*Cereal Box

*Metal Single Prong Clips

*Ribbon {I chose 2 colors for my bow (the pink is 5/8” and the black is 3/8”)}

*Hot Glue

*Needle & Thread

Now, to get started…..

bows-006_thumb1

* You are going to start by cutting out your cereal box template.

* I wanted to make a 3” bow, so I cut my template 3” x 4.5”. 

{{if you want to make a 2” bow, make the width of your template 2”….you can do this to make any size bow}}

bows-007_thumb1

* Making it even on both sides, cut a 1 inch strip down the middle of your template.

bows-008_thumb1

*Place your ribbon on the left side of the template and secure with a metal clip.

bows-010_edited-1_thumb1

* Wrap your ribbon tightly around the template {making sure the template does not bend}.

* Cut the ribbon & secure with a clip on the other end.

* I made my bow a 3 loop bow, but you can do more or less….whatever you desire.  Every time your ribbon bends around the template (where the arrows are pointing), that will be a loop.

bows-011_thumb1

* Grab your needle & thread. 

*Make your thread a double strand.

* Leave a tail behind your knot (make sure you knot your thread 3-4 times)  {You will use the tail when tying off the bow}

bows-013_thumb1

bows-018_thumb1

* Starting in the middle of the space you cut out, towards the bottom edge of the bottom row of ribbon, insert your needle from the back.

*Bring your needle up and back down through the top, towards the top edge of the bottom row of ribbon.

bows-019_thumb1

*Continue this until you have gone up and down through all the rows of ribbon.

* DO NOT cut off your needle.

bows-021_thumb1

*Carefully slide your ribbon off of your template.

bows-025_thumb1

*Grab the ribbon with your left hand and firmly pull the thread with your right hand until it is as tight as it will go and your bow is scrunched up together.

*Hold the bow together with your left hand.

bows-026_thumb1

*Continue to hold the bow with your left hand, as you wrap your thread around the center of the bow 5 or 6 times, very tightly.

bows-029_thumb1

*Use the tail of the thread you left & the rest of the thread with your needle on it to tightly tie several knots, securing your thread.

*Cut the thread closely to the knot.

bows-032_thumb1

*Use your hands to spread out the loops of the bow.

*Glue your bow onto a lined metal clip & complete with a center ribbon or knotted center ribbon (I did a knotted center ribbon)

That’s it…..you are done!!  Pretty easy right? 

You can pretty much do anything with this template!  Just make a different template for different sized bows & use different sizes of ribbon as well!  The possibilities are endless!

bows-041_thumb9

Alisa_Signature

Wednesday, August 24, 2011

What I Made Wednesday #22

There were some GREAT projects & recipes last week!  Thank you so much to all of you who take the time to link up your latest & greatest to our {What I Made Wednesday} Party!
image
Now onto the favorites…
 
image
This is such a GREAT idea!!  I love it!  She had the most views & is our Wednesday Winner….yeah for FREE advertising!  Great Job Karima’s Crafts!
image
These wooden birthday presents are oh so cute!!  Wouldn’t these make the best decorations at your next party???  Being Creative did a fabulous job on these!
 
image
The Farm Girl whipped up these mouth watering creations!!  Yummy!
 
image
My Lil’ Pumpkin Patch made these ADORABLE framed animal art!  I want to make them for my little man!
image
Now onto this week’s party…
Here are the details:
  • **NEW**  You must be a follower of our blog.
  • Everything you link up must be made by you.
  • Link up to your specific post - not your main blog. (Please no Etsy shops or giveaways)
  • Please post our button or link back to our blog so more people can join in the fun.
  • Visit at least 2 of the other participants and leave them a comment to show your LOVE!  We all love getting comments!!
  • **NEW** At the end of the week, the project that has received the most views will get their blog button on our sidebar for the next week!  You will be our {{Wednesday Winner}}!!  Yeah for free advertising! (:
Also, if you’ve been featured, don’t forget to grab our button!
image
Related Posts Plugin for WordPress, Blogger...